
Jetpack Compose — quick review
A quick review on Jetpack Compose going through some of its main topics.
Warning: You might find this article longer than usual, but I wanted to gather all Jetpack Compose important titles in one article to be a single point of reference for readers and avoid interruptions.
Jetpack Compose is a modern toolkit for building user interfaces in Android. It is a reactive and declarative framework that simplifies the process of creating and managing UI elements, and allows for a more efficient and flexible way to build apps. Jetpack Compose allows developers to create UI elements using simple, expressive code and eliminates the need for complex layout XML files. It also offers built-in support for animations, accessibility, and other advanced features.
@Composable
fun MyButton() {
    Column(
        modifier = Modifier.fillMaxWidth().padding(16.dp),
        verticalArrangement = Arrangement.Center,
        horizontalGravity = Alignment.CenterHorizontally
    ) {
        Button(
            onClick = { /* Perform action */ },
            modifier = Modifier.padding(8.dp),
            text = "Click me!"
        )
    }
}
This code sample creates a button that is centered within a column, with a padding of 16 dp around the column, and 8 dp around the button. The button’s text is set to “Click me!” and when the button is clicked, it will perform an action.
You can use this button inside your compose function and can apply any customize you want for example you can change the text color by adding MaterialTheme.typography() and passing your textColor.
----------------------------
Composables
A composable function is annotated with the @Composable annotation, which tells the compiler that this function can be used in the composition of the UI.
When a composable function is called, it creates a new composition scope. Inside this scope, other composable functions can be called, allowing for the creation of nested UI elements. This is similar to how a layout XML file defines nested views.
For example, in the previous code sample, the MyButton function is a composable function, which describes a button UI element. It takes no inputs, but it returns a description of a button that can be rendered on the screen. The button is created by calling the Button composable, which is provided by the Jetpack Compose library.
Composable functions can also take inputs, such as data or parameters. These inputs can be used to customize the UI elements that are created.
----------------------------
Main Layouts
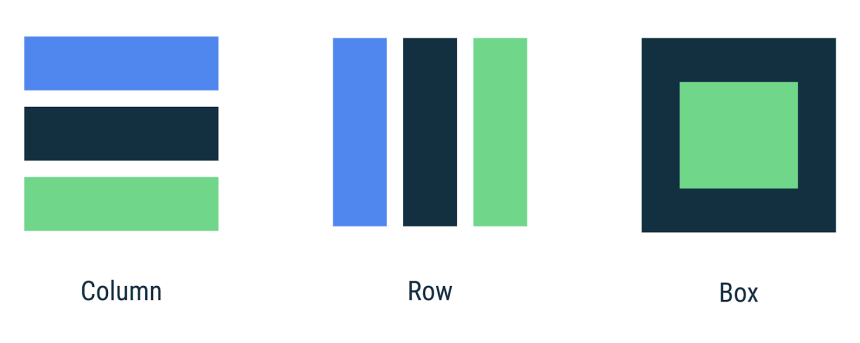
- Column: used to stack UI elements vertically. Each child element is placed below the previous one. It takes a list of children and a modifier as input.
Column(
    modifier = Modifier.fillMaxWidth().padding(16.dp),
    verticalArrangement = Arrangement.Center,
    horizontalGravity = Alignment.CenterHorizontally
) {
    Button(
        onClick = { /* Perform action */ },
        text = "Click me!"
    )
    Text("Hello World")
}
- Row: used to stack UI elements horizontally. Each child element is placed next to the previous one. It takes a list of children and a modifier as input.
Row(
    modifier = Modifier.fillMaxWidth().padding(16.dp),
    verticalArrangement = Arrangement.Center,
    horizontalGravity = Alignment.CenterHorizontally
) {
    Button(
        onClick = { /* Perform action */ },
        text = "Click me!"
    )
    Text("Hello World")
}
- Box: stacks its children on top of each other. The stacking order is defined by the order in which the children are called within the Box declaration, with the first child positioned at the bottom of the stack. It doesn’t have a background color or shape. It takes a list of children and a modifier as input.
Box(modifier = Modifier.padding(16.dp)) {
    Text("Hello World")
}
- Surface: used to create a container for other UI elements. It adds a background color or an image to the container and can also have a defined shape. It takes a child element and a modifier as input.
Surface(color = Color.Yellow, shape = RoundedCornerShape(10.dp)) {
    Text("Hello World")
}
- Card: used to create a container with a background color and a defined shape, usually with a shadow. It takes a child element and a modifier as input.
Card(elevation = 8.dp) {
    Text("Hello World")
}
- Scaffold: used to create the basic structure of an app, such as a top app bar, bottom navigation bar, and a floating action button. It takes a child element and a modifier as input.
Scaffold(
    topBar = {
        TopAppBar(title = { Text("My App") })
    },
    floatingActionButton = {
        FloatingActionButton(
            onClick = { /* Perform action */ },
            icon = { Icon(Icons.Filled.Add) }
        )
    },
    bodyContent = {
        Text("Hello World")
    }
)
- List: used to create a scrolling list of items. It takes a list of data and a lambda function as input. The lambda function is used to define how each item in the list should be displayed.
List(data) { item ->
    Text(item.name)
}
Please note that these are basic examples and you can customize the layout and its functionality as per your requirement.
----------------------------
Modifiers
In Jetpack Compose, modifiers are objects that are used to change the appearance or behavior of UI elements. They are applied to composable functions using the modifier parameter. Modifiers can be used to change the layout, size, position, and other properties of UI elements.
Here are some of the main properties of modifiers in Jetpack Compose:
- Layout: Modifiers can be used to change the layout of UI elements, such as padding, margin, and alignment.
Text("Hello World",
    modifier = Modifier.padding(16.dp)
)
- Size: Modifiers can be used to change the size of UI elements, such as width, height, and aspect ratio.
Image(
    asset = image,
    modifier = Modifier.preferredHeight(200.dp)
)
- Position: Modifiers can be used to change the position of UI elements, such as x and y coordinates.
Text("Hello World",
    modifier = Modifier.offset(x = 16.dp, y = 32.dp)
)
- Visibility: Modifiers can be used to control the visibility of UI elements, such as hiding or showing elements.
Text("Hello World",
    modifier = Modifier.visibility(visible = true)
)
- Background: Modifiers can be used to add background color, shapes and images to UI elements.
Surface(color = Color.Yellow, shape = RoundedCornerShape(10.dp)) {
    Text("Hello World")
}
- Clickable: Modifiers can be used to make a UI element clickable and perform an action when clicked.
Button(
    onClick = { /* Perform action */ },
    text = "Click me!"
)
These are just a few examples of the properties that modifiers can have, and there are many other properties and functions that you can use depending on your needs. Modifiers can be combined in different ways to create complex UI elements with different properties.
Note: Modifiers can be combined to create complex UI elements with different properties. The order in which modifiers are applied can affect the final result.
For example, you might want to add a padding to a UI element and then add a border to that element. In this case, you have to apply the padding modifier first and then the border modifier.
Here’s an example of how to combine the padding and border modifiers:
Text("Hello World",
    modifier = Modifier.padding(16.dp)
            .border(4.dp, Color.Red)
)
This code applies a padding of 16dp to the Text composable and then adds a border of 4dp with a red color. If you switch the order of Modifiers in the above examples, the result will be different, so you have to be careful when combining modifiers.
Modifiers can be also combined with + sign as well, for example:
val padding = Modifier.padding(16.dp)
val border = Modifier.border(4.dp, Color.Red)
Text("Hello World",
    modifier = padding + border
----------------------------
Annotations
Jetpack Compose has several annotations that are used to provide additional functionality or to improve the development process.
Here are some of the most commonly used annotations:
- @Composable: This annotation is used to mark a function as a composable. It tells the compiler that the function can be used in the composition of the UI.
@Composable
fun MyButton() {
    Button(
        onClick = { /* Perform action */ },
        text = "Click me!"
    )
}
- @Preview: This annotation is used to create a preview of a composable function in the Android Studio design editor. It allows developers to see the results of their code changes in the editor, without having to run the app on a device or emulator.
@Preview(name = "My Button Preview")
@Composable
fun MyButtonPreview() {
    MyButton()
}
- [Deprecated]
@Model:This annotation is used to mark a data class as a model for a composable function. It tells the compiler that the data class should be used as the source of truth for the composable function.
@Model
data class MyData(var text: String)

@Composable
fun MyText(data: MyData) {
    Text(data.text)
}
- @ExperimentalCoroutinesApi: This annotation is used to indicate that the code uses coroutines that are considered experimental. This annotation should be used when using the async and await functions.
@ExperimentalCoroutinesApi
fun myFunction() {
    GlobalScope.launch {
        // Coroutine code here
    }
}
These are just a few examples of the annotations that Jetpack Compose provides, and there are many other annotations that you can use depending on your needs.
It’s important to note that the use of some annotations may change between versions and it’s better to check the official documentation before using them.
----------------------------
MutableState
In Jetpack Compose, mutableState() is a function that is used to create a mutable state object in which you can store and manage data that is used by a composable function. This function allows you to change the value of the state object, which will trigger a recomposition of the UI, updating the UI elements that are affected by the change.
The mutableState() function takes an initial value as an argument and returns a MutableState object, which has two properties:
- The current value of the state object.
- A setter function that can be used to change the value of the state object.
Here’s an example of how to use mutableState() to create a counter that can be incremented or decremented:
val count = mutableState(0)

@Composable
fun Counter() {
    Column {
        Text("Count: ${count.value}")
        Button(onClick = { count.value-- }) {
            Text("-")
        }
        Button(onClick = { count.value++ }) {
            Text("+")
        }
    }
}
In this example, the count variable is created using the mutableState() function, with an initial value of 0. The Counter composable function displays the current value of the count, and two buttons that can be used to decrement or increment the count.
It’s important to note that mutableState should be used with care, it’s best practice to use it only when you want to change something in the UI based on the user interaction and not for any other purpose.
Also, if the state is not used in the composable, the recomposition will not happen, and it could lead to some performance issues.
Remember
In Jetpack Compose, remember { mutableState() } is a function that is used to create a mutable state object that is remembered across different compositions. This means that the state object is not recreated every time the composable function is recomposed, and its value is retained between compositions.
When a composable function is recomposed, the state objects that are created within the function are also recreated, which can lead to unnecessary work and performance issues. By using remember { mutableState() }, you can ensure that the state object is only created once and its value is retained between compositions.
Here’s an example of how to use remember { mutableState() } to create a counter that can be incremented or decremented:
val count = remember { mutableState(0) }

@Composable
fun Counter() {
    Column {
        Text("Count: ${count.value}")
        Button(onClick = { count.value-- }) {
            Text("-")
        }
        Button(onClick = { count.value++ }) {
            Text("+")
        }
    }
}
In this example, the count variable is created using remember { mutableState() }, with an initial value of 0. The Counter composable function displays the current value of the count, and two buttons that can be used to decrement or increment the count.
It’s important to note that using remember { mutableState() } is only necessary when a composable function is recomposed multiple times and the state object is used in the composable function. If the state object is not used in the composable function, it will not have any impact on the performance.
LiveData
You can listen to LiveData by using the remember { liveData() } function and the state composable.
The remember { liveData() } function is used to create a LiveData object that is remembered across different compositions. This means that the LiveData object is not recreated every time the composable function is recomposed, and its value is retained between compositions.
The state composable is used to observe the LiveData object and to update the UI when the value of the LiveData object changes.
Here’s an example of how to use remember { liveData() } and the state composable to listen to a LiveData object:
val data = remember { liveData(initialValue = "Hello World") }

@Composable
fun MyText() {
    state(data) { value ->
        Text(value)
    }
}
In this example, the data variable is created using remember { liveData() }, with an initial value of “Hello World”. The MyText composable function uses the state composable to observe the data variable, which is a LiveData object, and updates the UI with the latest value of the LiveData object.
----------------------------
ListView
You can build a ListView that listens to a LiveData observer to get and update its items by using the state composable, the List composable, and the remember { liveData() } function.
Here’s an example of how to build a ListView that listens to a LiveData observer to get and update its items:
val viewModel = ViewModelProvider(this).get(MyViewModel::class.java)
val data = remember { viewModel.liveData }

@Composable
fun MyListView() {
    state(data) { items ->
        List(items) { item ->
            Text(item.name)
        }
    }
}
In this example, you can create a ViewModel instance, and use remember { liveData } to get the LiveData from the viewModel and then use state to observe it.
The state composable is used to observe the LiveData object, and the List composable is used to display the items in the LiveData object.
The List composable takes a list of items as input, and a lambda function that is used to define how each item in the list should be displayed.
----------------------------
Side Effects
In Jetpack Compose, side effects are actions that are triggered by a composable function and do not affect the composable function’s output. These side effects are operations that are performed outside of the composable function, such as making a network request, accessing the storage or modifying the navigation state.
There are different types of side effects, and Jetpack Compose provides different ways to handle them depending on the type of side effect.
Here are the main types of side effects in Jetpack Compose:
[1] launchInComposition: This type of side effect is used to perform an operation that returns a Deferred object, such as a network request or a database operation. The launchInComposition function is used to launch the operation and to handle the result of the operation in the composable function.
val data = remember { viewModel.getData() }

@Composable
fun MyText() {
    state(data) { value ->
        Text(value)
    }
}
In this example, viewModel.getData() is a function that returns a Deferred object, and the launchInComposition function is used to launch the operation and to handle the result of the operation in the composable function.
[2] rememberCoroutineScope: This type of side effect is used to perform operations that require a CoroutineScope, such as animation and navigation. The rememberCoroutineScope function is used to create a CoroutineScope that is remembered across different compositions, and the launch function is used to launch the operation.
val scope = rememberCoroutineScope()

@Composable
fun MyAnimation() {
    scope.launch {
        // Animation code here
    }
}
In this example, rememberCoroutineScope is used to create a CoroutineScope that is remembered across different compositions, and the launch function is used to launch the animation operation.
[3] rememberSavedInstanceState: This type of side effect is used to persist the state of a composable function between configuration changes. The rememberSavedInstanceState function is used to create a state object that is remembered across different compositions, and the savedInstanceState composable is used to restore the state of the composable function.
val state = rememberSavedInstanceState()

@Composable
fun MyText() {
    val text = state[textKey] ?: "Hello World"
    Text(text)
    state[textKey] = text
}
In this example, rememberSavedInstanceState is used to create a state object that is remembered across different compositions, and the savedInstanceState composable is used to restore the state of the composable function.
[4] DisposableEffect: a type of side effect that is used to perform operations that need to be disposed of, such as a subscription to a stream of data or a timer.
A DisposableEffect is an object that has a dispose method that is called when the composable function that uses it is removed from the composition. This allows Jetpack Compose to clean up resources that are no longer needed, such as canceling a network request or stopping a timer.
Here’s an example of how to use DisposableEffect to subscribe to a stream of data and dispose of the subscription when the composable function is removed from the composition:
val data = remember { viewModel.dataStream }
val subscription = remember { data.subscribe() }

@Composable
fun MyText() {
    state(data) { value ->
        Text(value)
    }

    DisposableEffect(subscription::dispose)
}
In this example, remember { viewModel.dataStream } is used to get the stream of data, and remember { data.subscribe() } is used to create a subscription to the stream of data. The DisposableEffect composable is then used to dispose of the subscription when the composable function is removed from the composition.
It’s important to note that, DisposableEffect should be used with care as it could lead to resource leaks if not used properly. Also, it should be used when you are sure that the subscription is not needed anymore and you want to dispose it.
----------------------------
Pros and Cons
Jetpack Compose is a new UI framework for Android that offers several advantages over traditional Android development methods, but it also has some downsides.
Pros:
- Declarative UI: Jetpack Compose allows you to define the UI in a declarative way, which makes it easier to understand and maintain.
- Reactive programming: Jetpack Compose uses reactive programming concepts, which makes it easier to update the UI based on changes to the data.
- Improved performance: Jetpack Compose uses a more efficient layout engine and a more efficient way of handling UI updates, which can lead to improved performance.
- Better developer experience: Jetpack Compose provides a more modern and consistent developer experience, with improved error messages, better debugging tools, and improved support for advanced features such as animations and navigation.
- Easier testing: Jetpack Compose makes it easier to test your UI code, with improved support for unit testing and better separation of concerns.
Cons:
- Learning curve: Jetpack Compose is a new framework, and developers will need to learn new concepts and techniques to use it effectively.
- Limited support for third-party libraries: Jetpack Compose is still a relatively new framework, and support for third-party libraries is still limited.
- Limited backwards compatibility: Jetpack Compose is not backwards compatible with traditional Android development methods, and developers will need to refactor their existing code to use Jetpack Compose.
- Limited documentation: Jetpack Compose is still a relatively new framework, and documentation is still limited.
- Fewer experts: As it is a new framework, there are fewer experts in the market who have experience working with Jetpack Compose.
----------------------------
Takeaway
In conclusion, Jetpack Compose is a powerful and modern UI framework for Android that offers several advantages over traditional Android development methods, but it also has some downsides. Developers will need to weigh the pros and cons to decide whether Jetpack Compose is the right choice for their project.
-------------------------
Next Article ==> Jetpack Compose Animation